
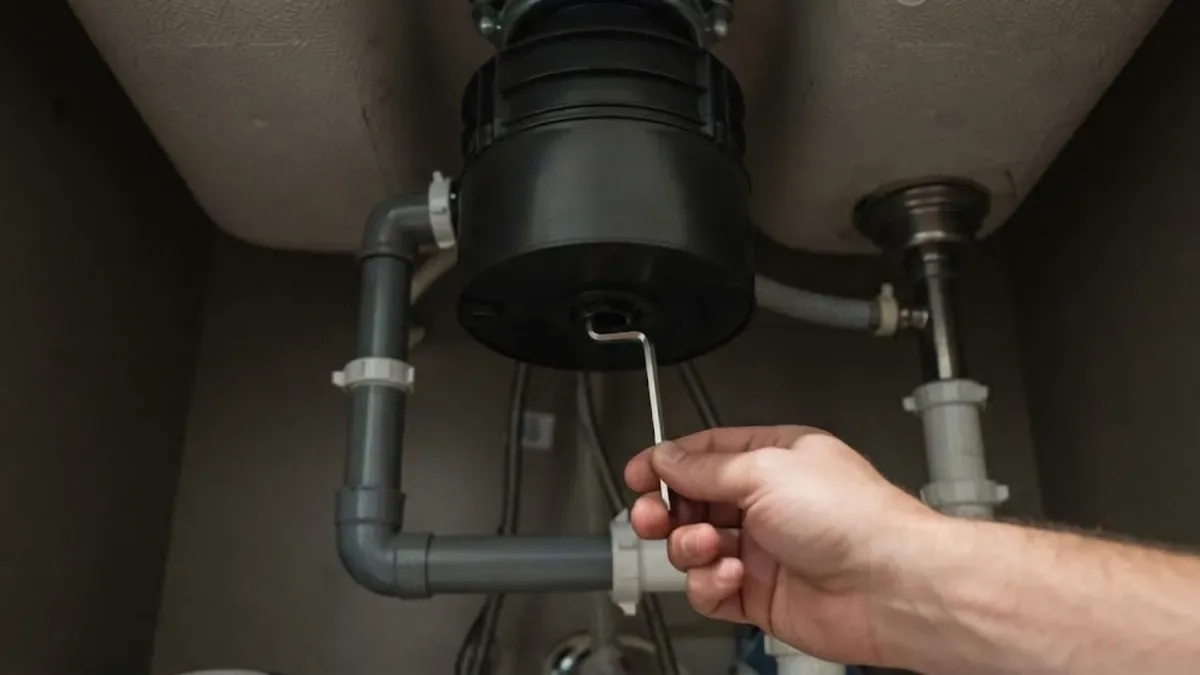
Garbage disposal repair
Garbage disposal repair, in plain terms
Garbage disposal repair means working out whether a unit is jammed, tripped, leaking or truly dead, and then freeing it, resealing it or swapping it. Most disposals are a motor sitting on a grinding plate, with a flywheel and two swivel impellers that push food against a shredder ring.
Despite the name, nothing in it cuts like a blade. Food is pounded against the ring by the flywheel, and the water carries the pulp out through the drain. That is why hard objects stall the motor and why grease, which cools and coats pipes, is the real enemy further down the line.
The line between a repair and a replacement is usually the housing. A jam is a cheap fix. A leak from the bottom of the shell or a seized bearing is not.
Disposal drains tie into the trap and branch arm under rules in the California Plumbing Code, which is based on the Uniform Plumbing Code (UPC), so a new unit still has to drain and vent correctly.
When a disposal is flooding the cabinet or the sink will not drain
Water pooling in the cabinet, a sink full of gray water that will not move, or a unit that smells of burning needs attention the same day. We take these calls around the clock, so a night or a holiday weekend is not a reason to wait.
Cut power first. A wet disposal and a live outlet are a bad pair.
While you wait for the plumber
- Switch the disposal off at the wall switch and, if the cord is plugged in under the sink, unplug it or trip the breaker.
- Never put a hand into the grinding chamber, even with the power off. Use tongs or pliers for any object you can see.
- Close the two stops under the sink only if a supply line is leaking. A disposal leak does not need them closed.
- Bail the standing water out of the sink with a cup and keep it out of the cabinet with towels.
- Do not run the dishwasher, because its drain feeds into the disposal.
The reset and hex-key routine, before you call
A good share of dead disposals are only jammed or tripped. These checks take about five minutes and are safe if you follow the order.
- 1
Kill the power
Turn off the switch, then unplug the unit or turn the breaker off. This comes first every time.
- 2
Free the flywheel with the hex key
Most units have a 1/4 inch hex socket in the center of the underside. Put the wrench in and work it back and forth until the flywheel turns freely a full revolution. Many disposals ship with this wrench.
- 3
Remove what jammed it
Look down the drain with a flashlight and pull out a bone, peach pit, fruit sticker or bottle cap with tongs. Never use your fingers.
- 4
Press the red reset button
It sits on the bottom of the housing and pops out when the motor overheats. Wait 10 minutes, press it in, restore power and run cold water as you switch it on.
If the unit hums again, trips immediately, or the hex key will not turn the flywheel, stop. The motor or bearing may be damaged, and repeated resets only cook the windings.
What the sound or leak points to
The symptom narrows the cause quickly.
| What you notice | Likely cause | Outcome |
|---|---|---|
| Hum, no spin | Jam in the grinding chamber | Hex key, usually repairable |
| Click or nothing at all | Tripped overload, dead switch or outlet | Reset, then test power |
| Drips from top flange | Failed sink flange seal or putty | Repair, reseal the flange |
| Drips from side pipe | Loose drain elbow gasket or bolts | Repair, new gasket |
| Leaks from bottom of shell | Cracked housing or failed internal seal | Replace the unit |
| Slow sink, odor | Grease and food buildup in the line | Clean the drain line |
| Loud grinding | Foreign object or worn bearing | Remove object, or replace |
Humming, jammed or leaking?
A few details about the sound and where the water shows up get us there with the right parts.
What should never go down a disposal
The kitchen drain is a long, narrow pipe, and these are the items that block it or ruin the unit.
- Grease, fat and oil.
They cool in the trap and downstream pipe and harden into a plug. Wipe pans with a paper towel and put it in the trash.
- Coffee grounds and eggshells.
They pack into a paste. The popular idea that shells sharpen the unit is a myth.
- Pasta, rice and potato peels.
They absorb water and swell into a starchy mass in the trap.
- Fibrous food like celery, corn husks and artichoke.
The strings wrap around the impellers.
- Bones, fruit pits and shells.
Hard enough to jam the flywheel or chip the shredder ring.
- Non-food items.
Glass, metal, rubber bands, sponges and plastic. Chemical drain cleaner is also a poor idea, since it sits in a stalled unit and eats seals.
Disposal installation and replacement
A new unit is a straightforward install if the sink and wiring cooperate. These are the choices that matter.
Choose the horsepower
A 1/3 or 1/2 hp unit suits light home use. A 3/4 or 1 hp model grinds finer and jams less, which matters for large households.
Know what you have
Mounting systems differ by brand. A quick-lock mount makes the swap faster, but an older three-bolt flange may need new putty and a new mounting ring.
Power and switch
The unit plugs into an outlet under the sink or is hard-wired. Wiring changes should be done by a licensed professional, and permit rules vary, so ask the Manhattan Beach building department.
Dishwasher connection
The dishwasher drain hose attaches to a knockout port on the disposal. The plug in the port must be removed on a new unit, or the dishwasher will back up.
Manhattan Beach note
Kitchen drains and the city sewer lateral
If your kitchen sink and a downstairs bathroom both back up, the problem is likely not the disposal. In Manhattan Beach the City maintains most sewer mains, and the lateral from the home to the main is the property owner's responsibility under Municipal Code 5.36.240. Call the City utilities office at (310) 802-5304 before any aggressive cleaning of the lateral, because extra flow can block the main.
For a drain that is slow even with a clean disposal, drain cleaning with a cable and a camera will show where the grease has formed a plug.
Sources: City of Manhattan Beach
What drives the cost of a disposal job
We give a clear price before work starts.
Freeing a jam is the shortest visit. A new unit adds the part and installation time.
A larger unit with insulation and stainless grinding parts costs more to buy.
Reusing a good mount saves time. Rewiring or adding an outlet increases the scope.
A clogged line downstream may need cleaning in addition to the unit.
An evening or weekend visit is priced differently, and we tell you before dispatch.
Insurance may cover water damage from a sudden leak but seldom covers wear, so ask your insurer. Photograph the cabinet before cleanup.
FAQs
Garbage disposal questions
Yes. Leaks into the cabinet and sinks that will not drain are handled on the 24/7 line, with same-day visits when available. Switch off the unit and the dishwasher while you wait.
Turn off power, turn the flywheel with a 1/4 inch hex key from underneath, remove the jam, then press the red reset. If it hums again, call.
No. Chemicals can damage seals and splash back on you. A cable or hydro jetting clears a clog without the risk.
Typically around 8 to 12 years, depending on use and what goes down it. A rusted shell or a seized bearing means it is done.
The disposal drains into one basin and a shared trap. A blockage past the trap backs up both. That is a line problem, not the disposal.
Yes. Most brands are interchangeable if the mount fits. We check the flange and the dishwasher port first.